torsdag den 22. marts 2012

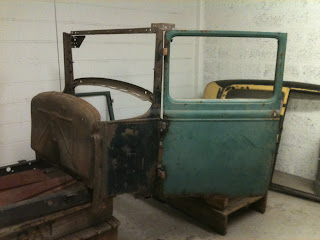
A lot of talk and a little grinding

Yesterday night I didn't get much done, as there was visitors in the shop, who kept talking to me - even when I turned on the angle grinder!
Got the inner parts of the A post brushed down with a steel brush cup, and gave them some zink base coat, and then it was almost ten o'clock and time to go home.


Next week I might start making parts for replacement of the rusted through parts.

Keep 'em kruzin!
Dannerr

torsdag den 15. marts 2012

Other side

Yesterday night I cut out the other side of the lower cowl piece.
In order to get around the hinge, I made a cut in the otherwise very fine piece, Victor made for me.
 We made the piece to fit the bead, where the bonnet meets the cowl, and are cutting it there.
 The cut was done with a air driven hacksaw, in order to get the cut as thin as possible. And then I made the mistake of cutting to close to the edge of the replacement piece, so the saw bended the cut off and I had to align it to the edge - instead I should have made the cut about 1/2 inch from the edge, cutting through both plates. I'll do that next time!
 The doorpost is just as bad on the drivers side, so we're talking about spending a day fixing the bottom of those as well, now that I have gained acces.
So next week I'll either be doing the bottom of the doorposts or building more of the subframe.
At least, that's the plan - but as we all know, plans are made to be changed!

Keep 'em kruzin!
Dannerr

torsdag den 8. marts 2012

First piece cut out

So, yesterday it happened: I cut out the first piece of sheet metal to be replaced with new.
Still needs more rectangular pipe and steel for brackets, so I started with tacking the sub frame legs to the subframe, in order to release the welding clamps. Then the rest of the evening was spend with aligning and clamping the new bottom of the cowl to the existing, cutting through both of them at once with an airdriven saw and cut the old piece off (forgot to take pictures underway, this is taken afterwards).

Unfortunately the inner profile was very rusted, so I'll have to grind it down and give it some zink spray, before the new piece could be welded on.
So, now I know, how to do it on the drivers side as well - and if there is still no rectangular pipe and bracket steel next week, I'll grind down and spray, and start on the drivers side.

fredag den 2. marts 2012

How to screw off stuck manifold nuts.

Instead of writing yet another blog post, this is done as a do-it-yourself project - however, some of the parts needed for the project in this specific maner, can be rather hard to find.

You take:
1 can of WD40
1 Stereo
1 MP3 player with Agent Orange - in this case an iPhone
1 (or more) hammers
1 set of inch sized socket wrenches
1 set of millimeter sized socket wrenches
1 weight appropriate, danish, former machinist - in this case a nerdy, mechanical engineer, from here on out named "enginerd" as a combination of "engineer" and "nerd", a term invented by my girlfriend

Spray plenty of WD40 on the bolts, and let sit for at least 2 weeks. Do not forget it any longer, as you might end up looking too surprised, when the Mafia-in-law asks about what you are doing.
Then turn on the stereo, plug in the MP3 player and turn on Agent Orange.
Let the frustrated dane scratch the back of his head, until he finds out, he DOES need the millimeter sized socket wrenches - and have him go and pick it up.
Take a (5/8 I belive?) inch sized socket and wrench for the two nuts in the front, and have the enginerd lay his weight in to it. If he comes up short, try to increase the volume on the stereo with Agent Orange playing, and let him try again - this should get them loose. For the aft most nut, have the enginerd hammer a smaller (9/16 I belive?) inch socket on it, and have him loosen it with the wrench. Again, try to increase the volume, if it does not succeed in the first try. For the second aft most nut, have him hammer a 17mm socket on it, and use his weight to untie the nut.
When all the nuts are off, look at them to see, how corroded they are:

After inspection of the nuts (no pun intended!), have the enginerd start hammer out some of his anger on the exhaust manifold in order to get both of them off. When they are off, inspect the water and dirt damage on the manifolds:

And also inspect the intake and exhaust holes in the block:

Afterwards, start looking at the back side of the manifold. Discover it is originally for a Ford-Köln G28T industrial engine, hence the markings:

Now, start to wonder if the entire engine is a G28T. Got to bed. Keep wondering. Finally, fall asleep.

torsdag den 1. marts 2012

Hinges

Tonight I had hoped to be able to make some brackets for the fire wall to mount to the subframe. But as there were no flat iron in the shop, I started fixing the old door hinges. First I tested the alignment with a round bar, but found out two of them still had the pin stuck in them. So we heated the brackets up with the torch, in order to hammer out the left pins.


Then we took apart the hinges on the doors, where all still had the pin in them. One of them was real hard to get out, it took several times with the heat, and then it had still only moved less than half an inch. So we finally yield, grinded the pin down, heated it up again, and hammered it backwards into the bracket. So now it is stuck in there, but on one of the hinges, I shall not use.
So around ten o'clock, I could hang the door on the cowl without having to hold it.

Next week the flat iron should be home, so then I'm back to the original plan - start up front and work my way backwards.